
Terraformを使ってWordPress on Bitnami on AWSを新しいバージョンに移行した作業ログ(6)〜Really Simple SSLを使ってサイトをHTTPSでアクセスできるようにする〜
※「Terraformを使ってWordpress on Bitnami on AWSを新しいバージョンに移行した作業ログ」全体の目次
前回の記事はこちら
Terraformを使ってWordPress on Bitnami on AWSを新しいバージョンに移行した作業ログ(5)〜All-in-One WP Migrationでコンテンツ移行とBitnamiのアイコン消し〜
今回はこの部分の作業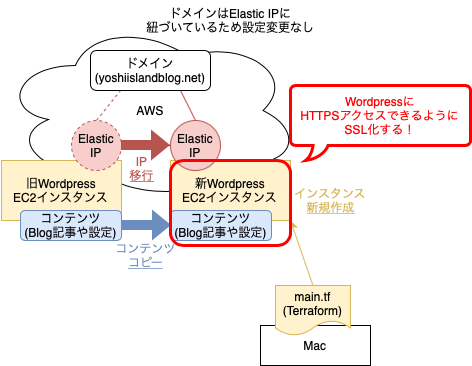
ブログサイトのSSL化をして、HTTPSアクセスができるようにする
今回は、Really Simple SSL というプラグインを利用する
参考:Really Simple SSL
wp-config.phpの権限設定変更
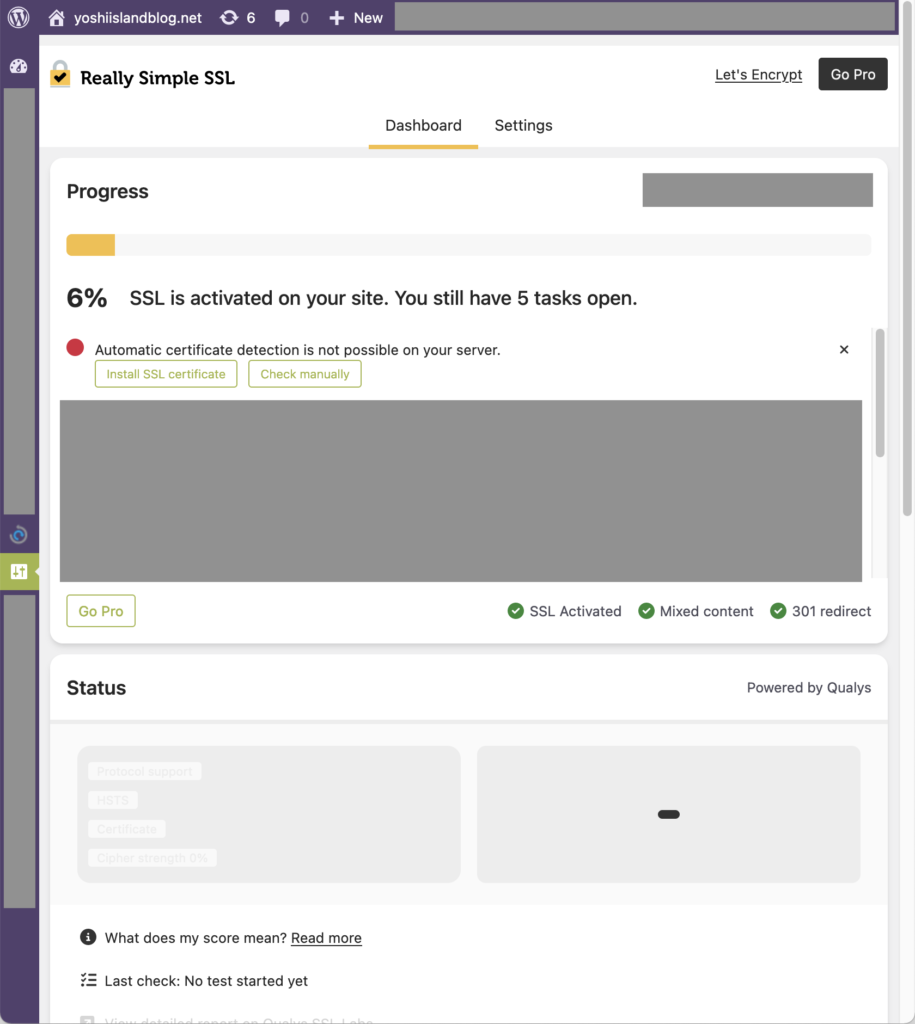
「Settings」>「SSL」から、Really Simple SSLの設定を確認する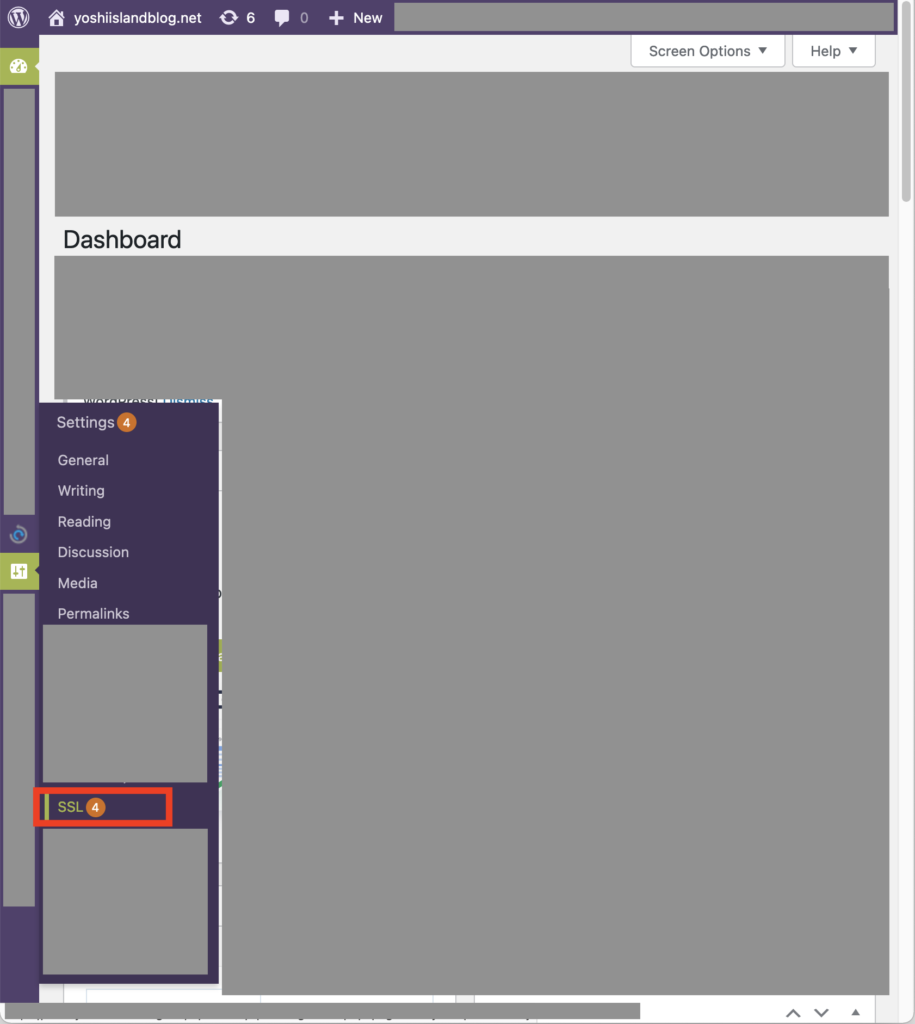
「A definition of a site url or home url was detected in your wp-config.php, but the file is not writable. Set your wp-config.php to writable and reload this page.」
「The wp-config.php file is not writable, and needs to be edited. Please set this file to writable.」
とエラーメッセージができている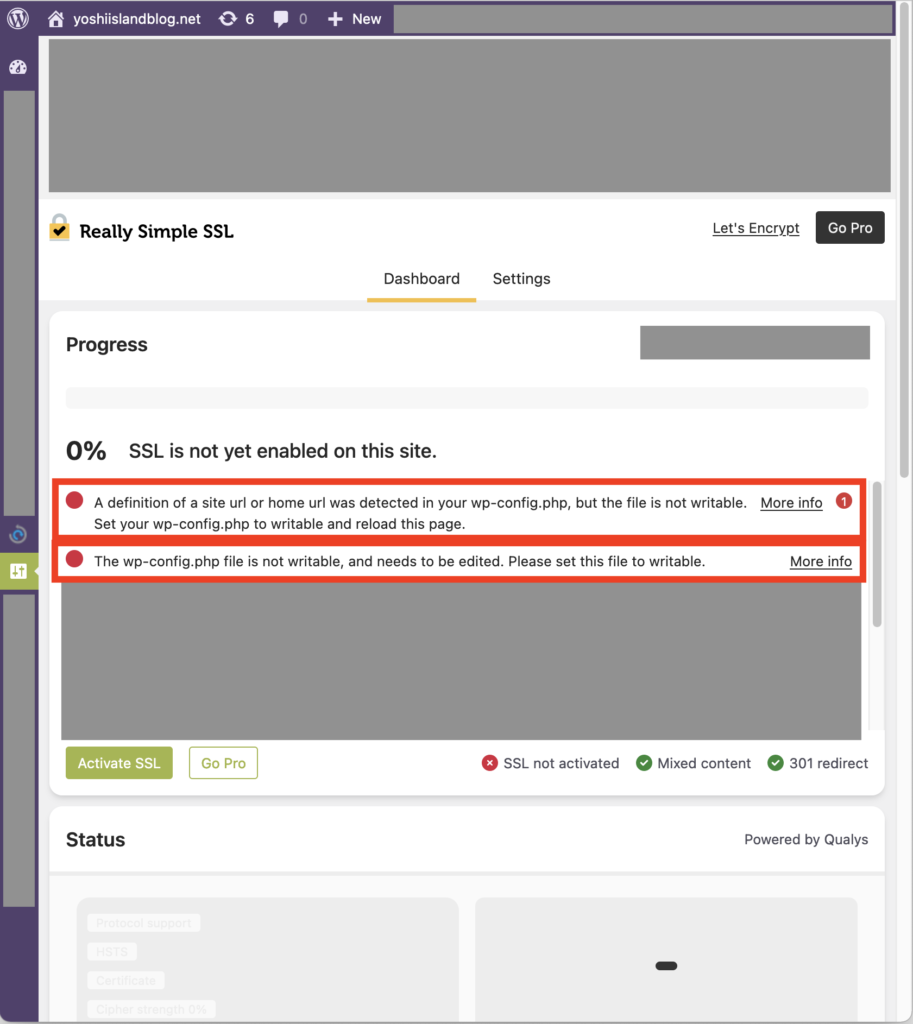
とにかくwp-config.phpをwritableにしろよ、とのことなのでchmodコマンドで設定を変える
参考:WordPressのSSL化ー(1)「wp-config.php」の権限変更
$ ls -liah /opt/bitnami/apps/wordpress/htdocs/wp-config.php
402468 -rw-r----- 1 bitnami daemon 4.2K Mar  9 01:47 /opt/bitnami/apps/wordpress/htdocs/wp-config.php
$ cp --parents /opt/bitnami/apps/wordpress/htdocs/wp-config.php ~/backup/
$ chmod 660 /opt/bitnami/apps/wordpress/htdocs/wp-config.php
$ ls -liah /opt/bitnami/apps/wordpress/htdocs/wp-config.php
402468 -rw-rw---- 1 bitnami daemon 4.4K Mar  9 02:56 /opt/bitnami/apps/wordpress/htdocs/wp-config.php
$
Let’s Encrypt 証明書発行
wp-config.phpをwritableにしてみると、「The wp-config.php file is not writable, and needs to be edited. Please set this file to writable.」のメッセージは消えた
代わりに「Automatic certificate detection is not possible on your server.」というメッセージが出ている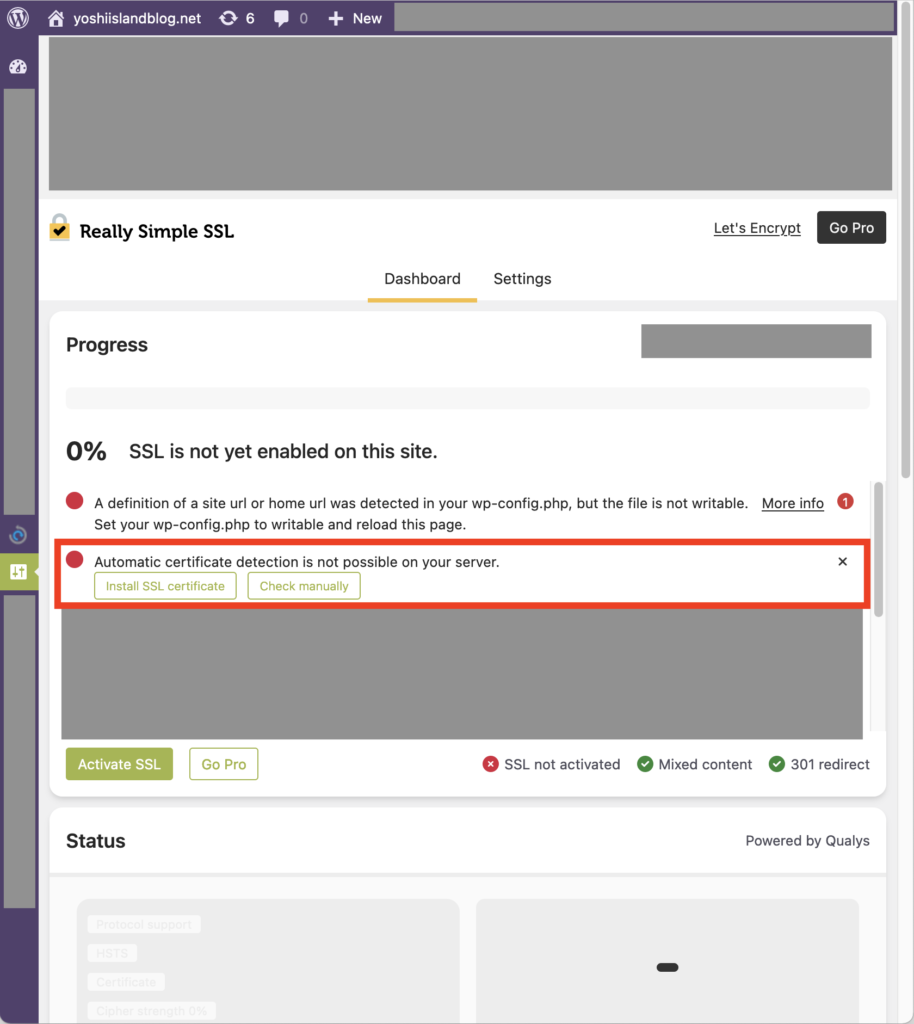
手動で証明書を作る必要があるので、過去記事の手順通りに進める
「$ sudo /opt/bitnami/bncert-tool」コマンドで、証明書の発行しようとすると、
新しいバージョンをダウンロードしろ、とメッセージが出てくる
$ sudo /opt/bitnami/bncert-tool
An updated version is available. Would you like to download it? You would need to run it manually later. [Y/n]: Y

The tool will exit now. To run the updated version run the following command:

/opt/bitnami/bncert-tool

$
メッセージに従って、もう一回同じコマンドを実行する
途中対話形式で色々聞かれるので、入力しつつ進める
※ 途中で「please be patient」と出る通り少し時間がかかる
$ sudo /opt/bitnami/bncert-tool
----------------------------------------------------------------------------
Welcome to the Bitnami HTTPS Configuration tool.

----------------------------------------------------------------------------
Domains

Please provide a valid space-separated list of domains for which you wish to
configure your web server.

Domain list []: yoshiislandblog.net, www.yoshiislandblog.net

----------------------------------------------------------------------------
Enable/disable redirections

Please select the redirections you wish to enable or disable on your Bitnami
installation.


Enable HTTP to HTTPS redirection [Y/n]: Y


Enable non-www to www redirection [Y/n]: Y


Enable www to non-www redirection [y/N]: N


----------------------------------------------------------------------------
Changes to perform

The following changes will be performed to your Bitnami installation:

1. Stop web server
2. Configure web server to use a free Let's Encrypt certificate for the domains:
yoshiislandblog.net www.yoshiislandblog.net
3. Configure a cron job to automatically renew the certificate each month
4. Configure web server name to: www.yoshiislandblog.net
5. Enable HTTP to HTTPS redirection (example: redirect
https://yoshiislandblog.net to https://yoshiislandblog.net)
6. Enable non-www to www redirection (example: redirect yoshiislandblog.net to
www.yoshiislandblog.net)
7. Start web server once all changes have been performed


Do you agree to these changes? [Y/n]: Y


----------------------------------------------------------------------------
Create a free HTTPS certificate with Let's Encrypt

Please provide a valid e-mail address for which to associate your Let's Encrypt
certificate.

Domain list: yoshiislandblog.net www.yoshiislandblog.net

Server name: www.yoshiislandblog.net

E-mail address []: hogehoge@example.com

The Let's Encrypt Subscriber Agreement can be found at:

https://letsencrypt.org/documents/LE-SA-v1.3-September-21-2022.pdf

Do you agree to the Let's Encrypt Subscriber Agreement? [Y/n]: Y


----------------------------------------------------------------------------
Performing changes to your installation

The Bitnami HTTPS Configuration Tool will perform any necessary actions to your
Bitnami installation. This may take some time, please be patient.

----------------------------------------------------------------------------
Success

The Bitnami HTTPS Configuration Tool succeeded in modifying your installation.

The configuration report is shown below.

Backup files:
* /opt/bitnami/apache2/conf/httpd.conf.back.202303000000
* /opt/bitnami/apache2/conf/bitnami/bitnami-apps-prefix.conf.back.202303000000
* /opt/bitnami/apache2/conf/bitnami/bitnami.conf.back.202303000000

Find more details in the log file:

/tmp/bncert-202303000000.log

If you find any issues, please check Bitnami Support forums at:

https://github.com/bitnami/vms

Press [Enter] to continue:

$
後続作業
先程の画面で「Activate SSL」をクリック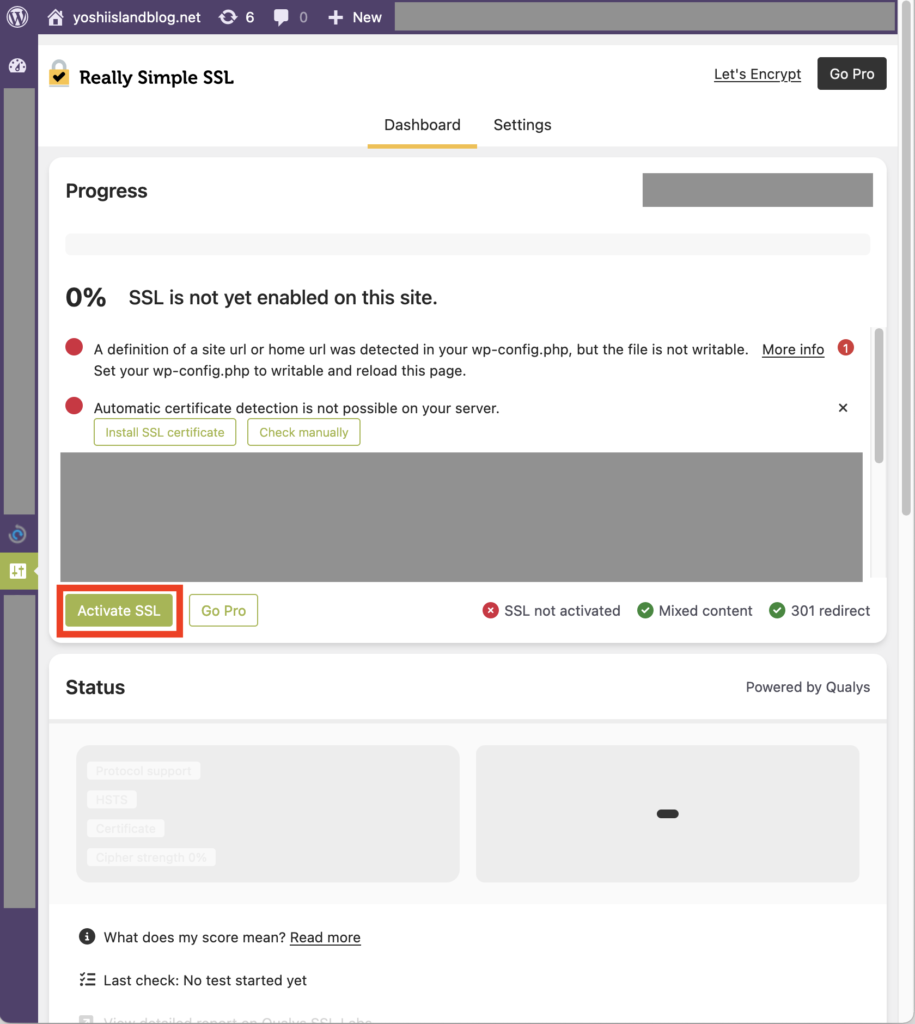
「Refresh SSL status」をクリック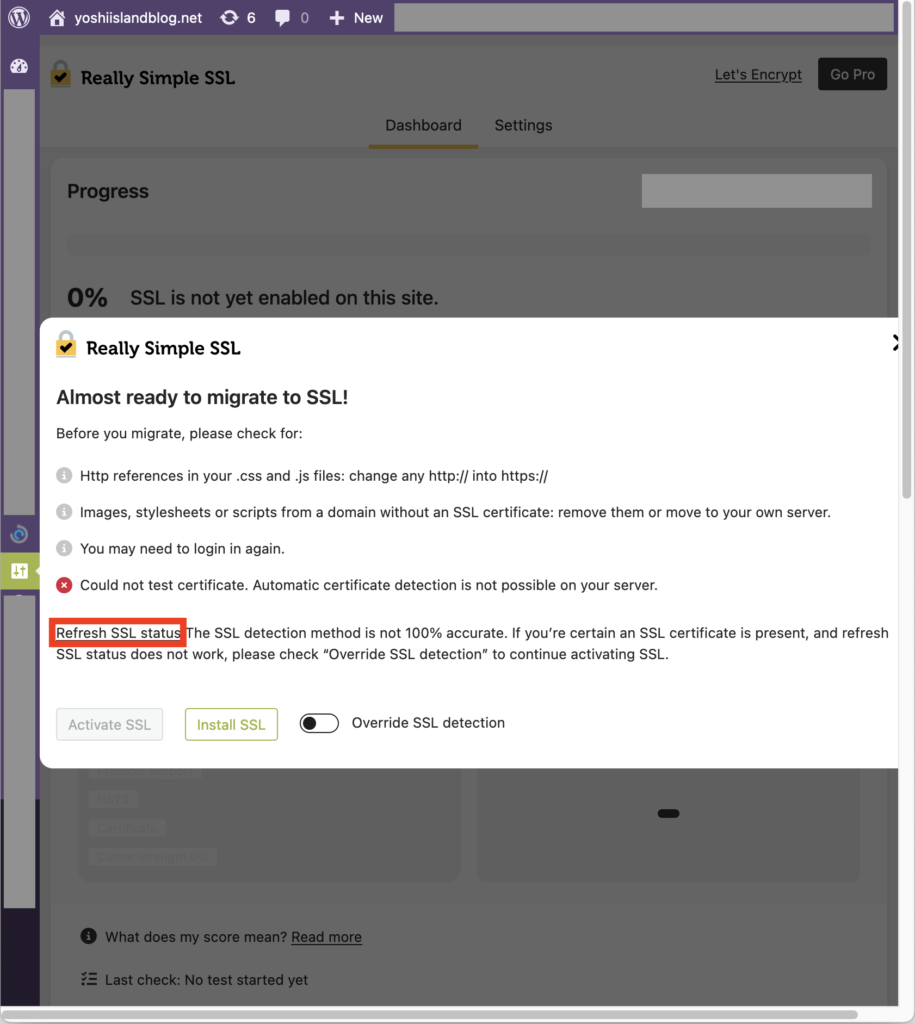
、、、しても変わらないので、「Override SSL detection」して「Activate SSL」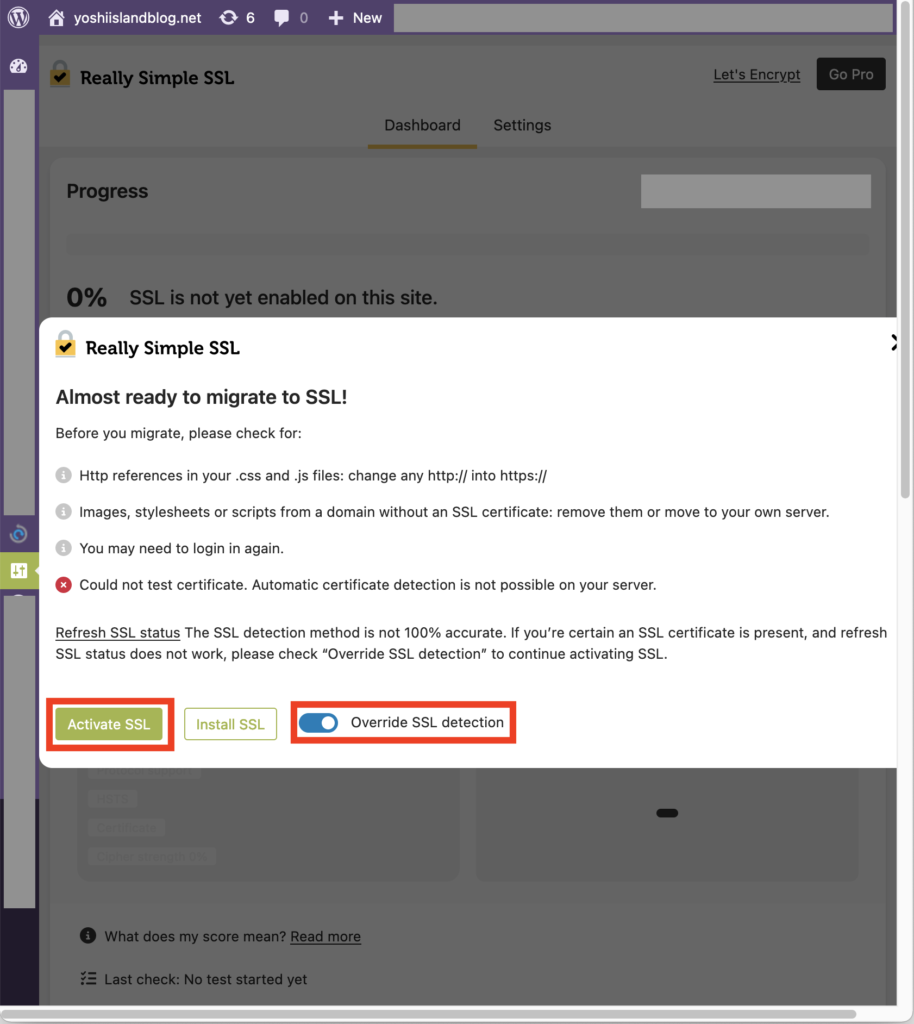
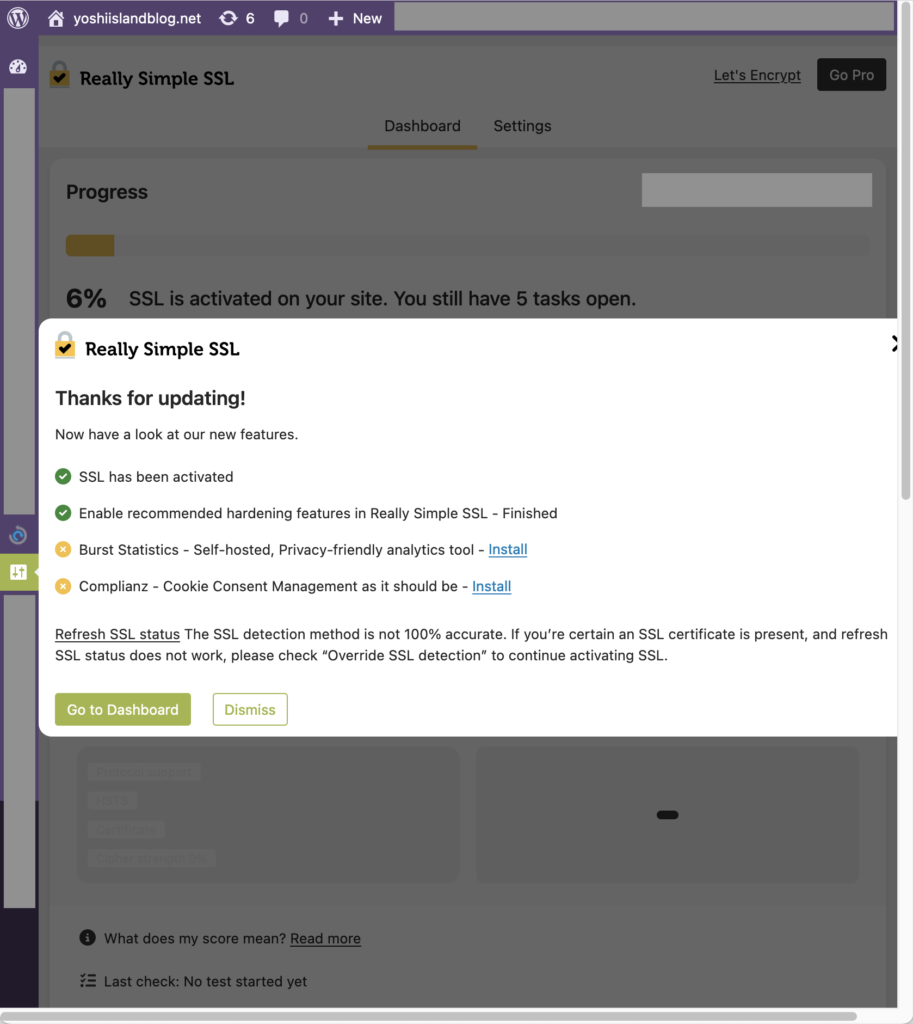
「Enable recommended hardening features in Really Simple SSL」をEnable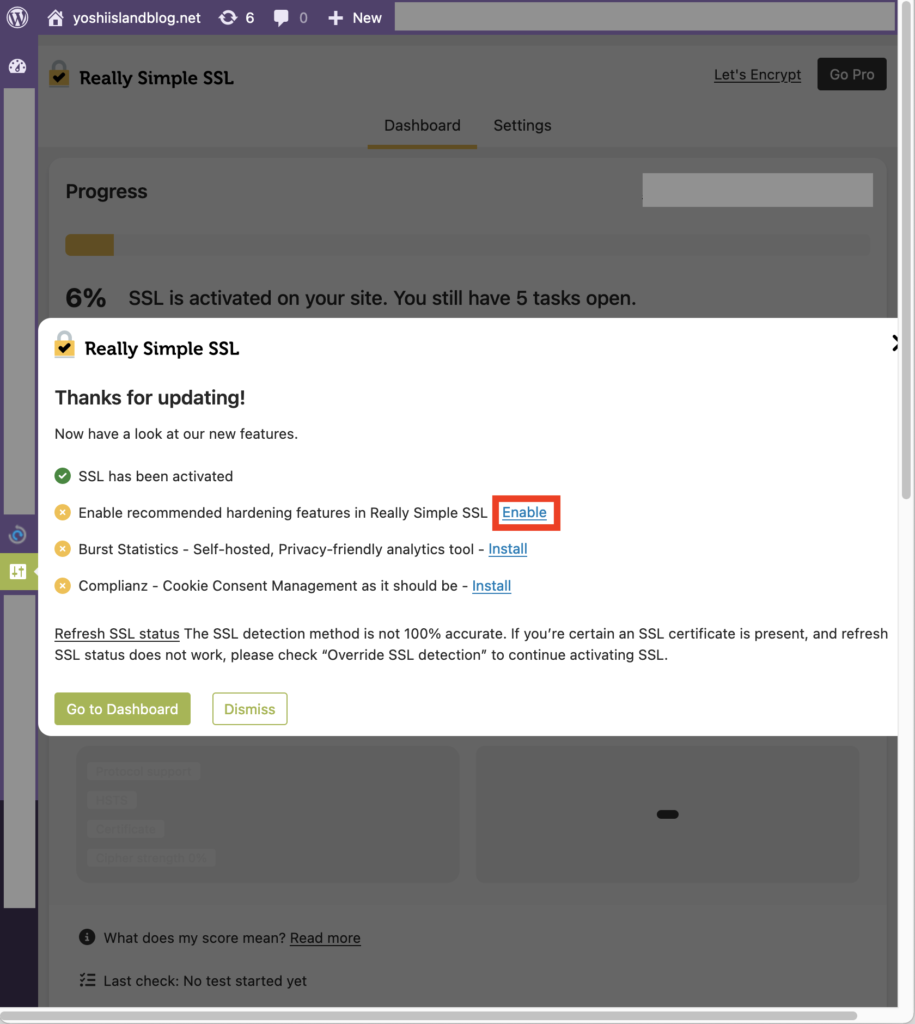
「Burst Statistics – Self-hosted, Privacy-friendly analytics tool 」をInstallしたがFailed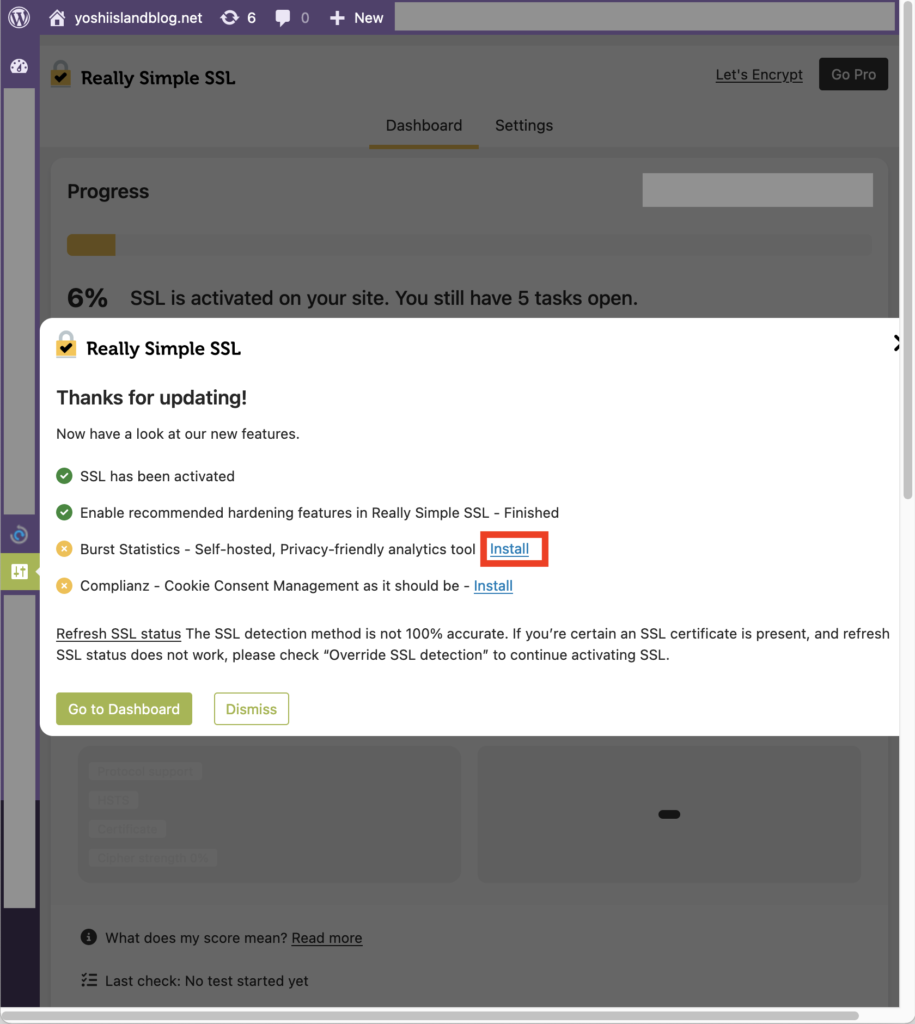
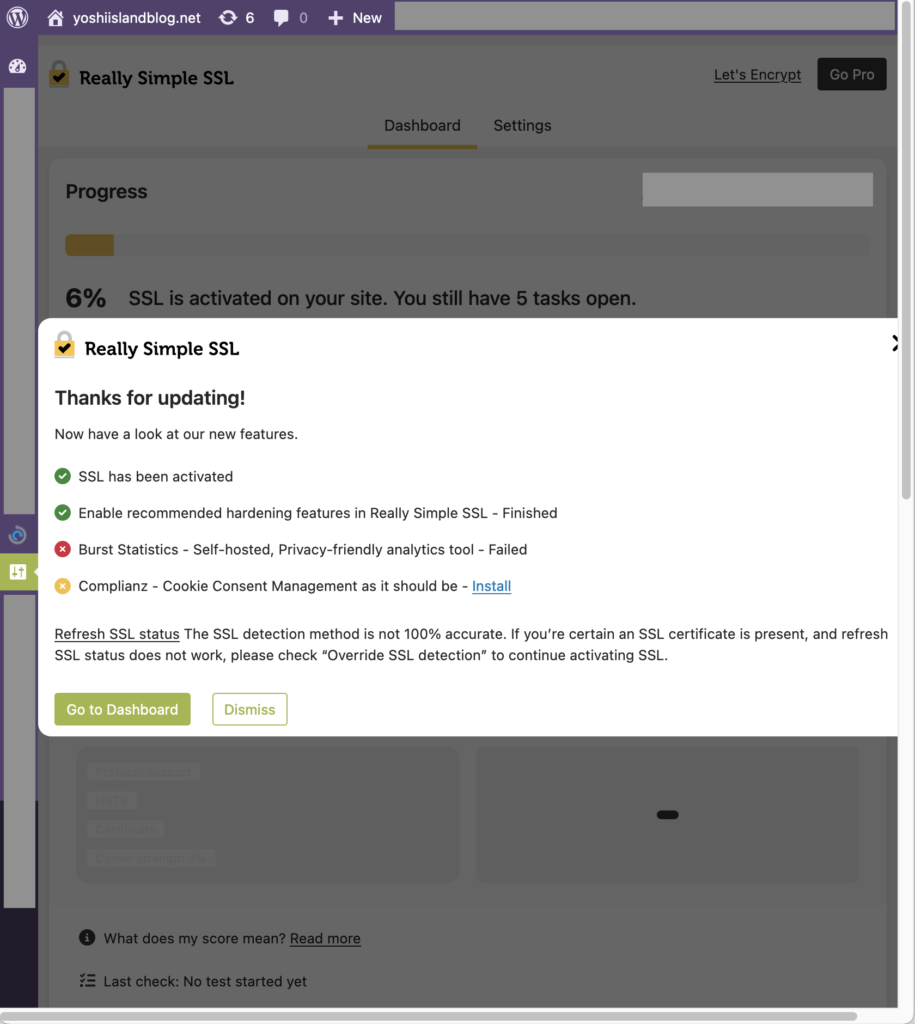
気にせず進む
「Complianz – Cookie Consent Management as it should be」をInstallしたがFailed
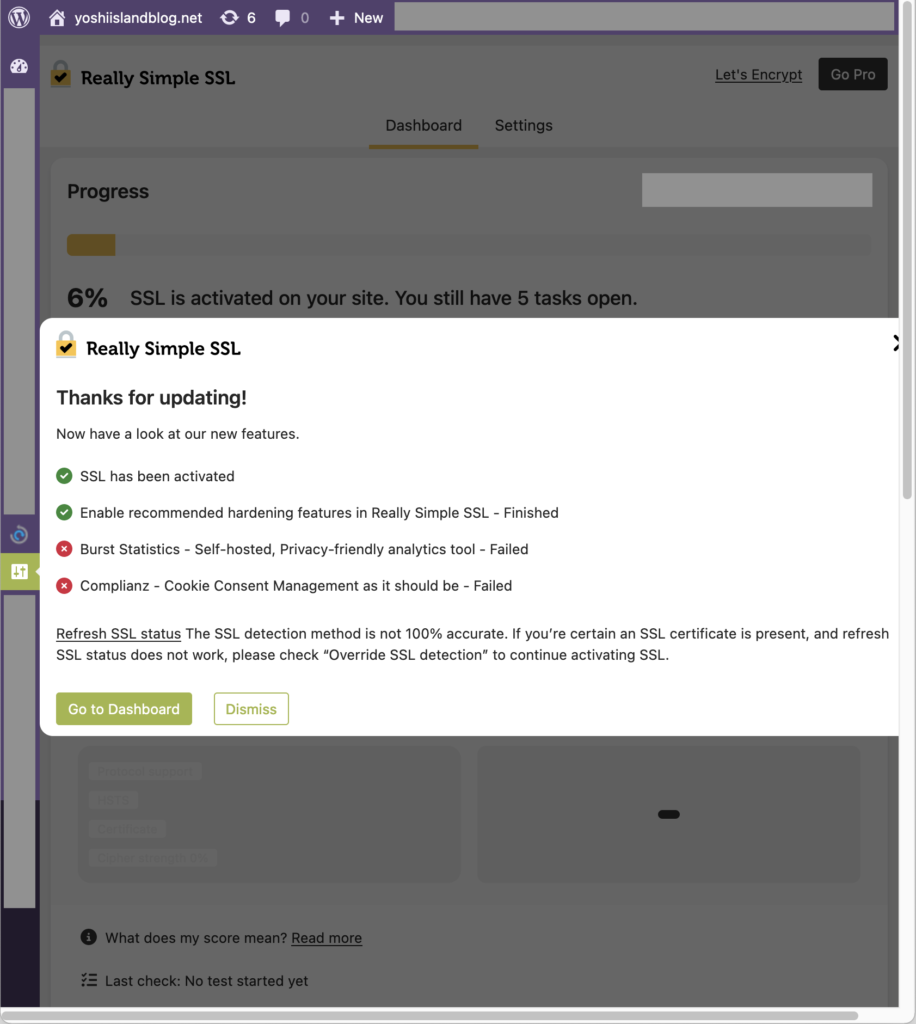
気にせず「Go to Dashboard」
Chromeの方でも無事にHTTPSアクセスできるようになった!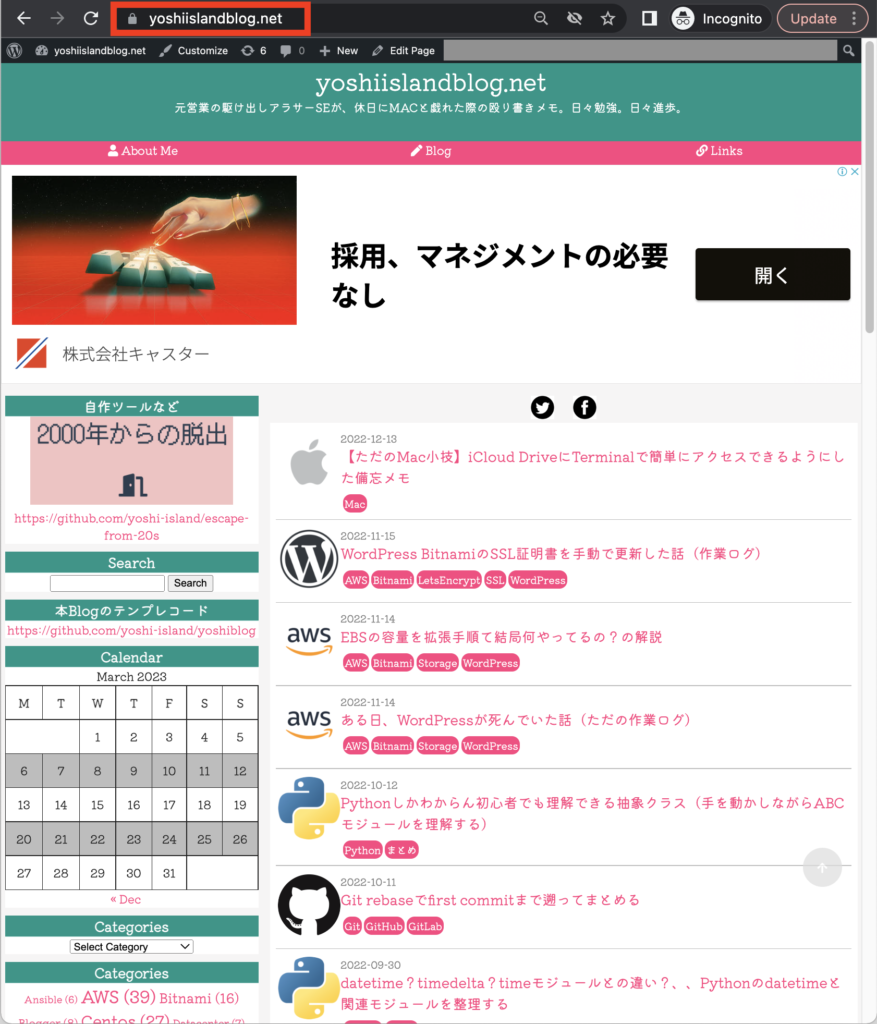
以上、、?(残タスク記事を追々あげるかも)