この記事は3年以上前に書かれた記事で内容が古い可能性があります
OpenDCIMをインストールしてみた
Dockerで楽々立ち上げる方法はこちら
参考:OpenDCIMをDockerで立ち上げる
ラックのExcel管理から脱出したい、というモチベーションから、フリーで使える、OpenDCIMをいじってみた。
こちらのサイトを参考に構築した
オープンソースのデータセンター管理ツール『openDCIM』をインストールしてみた
使ったboxはこちら
centos/6
boxを入れて、
% vagrant init centos/6
% vagrant up
sshで入る。(スーパーユーザになっておく)
% vagrant ssh
[vagrant@localhost ~]$ sudo su
[root@localhost vagrant]#
必要なパッケージをインストール
# yum install httpd php mysql mysql-server php-mbstring php-mysql mod_ssl
mysql起動
# /etc/init.d/mysqld start
Initializing MySQL database:  Installing MySQL system tables...
OK
Filling help tables...
OK

To start mysqld at boot time you have to copy
support-files/mysql.server to the right place for your system

PLEASE REMEMBER TO SET A PASSWORD FOR THE MySQL root USER !
To do so, start the server, then issue the following commands:

/usr/bin/mysqladmin -u root password 'new-password'
/usr/bin/mysqladmin -u root -h localhost.localdomain password 'new-password'

Alternatively you can run:
/usr/bin/mysql_secure_installation

which will also give you the option of removing the test
databases and anonymous user created by default.  This is
strongly recommended for production servers.

See the manual for more instructions.

You can start the MySQL daemon with:
cd /usr ; /usr/bin/mysqld_safe &

You can test the MySQL daemon with mysql-test-run.pl
cd /usr/mysql-test ; perl mysql-test-run.pl

Please report any problems with the /usr/bin/mysqlbug script!

                                                           [  OK  ]
Starting mysqld:                                           [  OK  ]
#
データベース作成とパスワード設定
# mysql
Welcome to the MySQL monitor.  Commands end with ; or \g.
Your MySQL connection id is 2
Server version: 5.1.73 Source distribution

Copyright (c) 2000, 2013, Oracle and/or its affiliates. All rights reserved.

Oracle is a registered trademark of Oracle Corporation and/or its
affiliates. Other names may be trademarks of their respective
owners.

Type 'help;' or '\h' for help. Type '\c' to clear the current input statement.

mysql> create database dcim;
Query OK, 1 row affected (0.00 sec)

mysql> grant all privileges on dcim.* to 'dcim'@'localhost' identified by 'password';
Query OK, 0 rows affected (0.00 sec)

mysql>
mysql> quit
Bye
[root@localhost vagrant]#
ssl設定
# cd /root
# openssl genrsa -out ca.key 1024
Generating RSA private key, 1024 bit long modulus
...................++++++
.........++++++
e is 65537 (0x10001)
# openssl req -new -key ca.key -out ca.csr
You are about to be asked to enter information that will be incorporated
into your certificate request.
What you are about to enter is what is called a Distinguished Name or a DN.
There are quite a few fields but you can leave some blank
For some fields there will be a default value,
If you enter '.', the field will be left blank.
-----
Country Name (2 letter code) [XX]:
State or Province Name (full name) []:
Locality Name (eg, city) [Default City]:
Organization Name (eg, company) [Default Company Ltd]:
Organizational Unit Name (eg, section) []:
Common Name (eg, your name or your server's hostname) []:
Email Address []:

Please enter the following 'extra' attributes
to be sent with your certificate request
A challenge password []:
An optional company name []:
#

# cp ca.csr /etc/pki/tls/certs
# cp ca.key /etc/pki/tls/certs
ssl.confの書き換え
ポート番号443を使いたいので、デフォルトは適当に5555としておく。
(自分の環境はDCIM専用なのでこれで良いですが、自身の環境に合わせてください)
# cp /etc/httpd/conf.d/ssl.conf /etc/httpd/conf.d/ssl.conf.`date -I`
# vim /etc/httpd/conf.d/ssl.conf

# diff /etc/httpd/conf.d/ssl.conf /etc/httpd/conf.d/ssl.conf.2017-07-28
74c74
< <VirtualHost _default_:55555>
---
> <VirtualHost _default_:443>
105c105
< SSLCertificateFile /etc/pki/tls/certs/ca.crt --- > SSLCertificateFile /etc/pki/tls/certs/localhost.crt
112c112
< SSLCertificateKeyFile /etc/pki/tls/certs/ca.key --- > SSLCertificateKeyFile /etc/pki/tls/private/localhost.key
#
httpd.confの書き換え
IPアドレスは自分の環境に合わせて書き換えてください。
# cp /etc/httpd/conf/httpd.conf /etc/httpd/conf/httpd.conf.`date -I`
# vim /etc/httpd/conf/httpd.conf

# diff /etc/httpd/conf/httpd.conf /etc/httpd/conf/httpd.conf.2017-07-28
276c276
< ServerName 192.168.33.30:80 --- > #ServerName www.example.com:80
1010,1023d1009
<
< <VirtualHost *:443>
< DocumentRoot /var/www/opendcim
< ServerName 192.168.33.30:443
< SSLEngine on
< SSLCertificateFile /etc/pki/tls/certs/ca.crt
< SSLCertificateKeyFile /etc/pki/tls/certs/ca.key
< <Directory /var/www/opendcim>
< AuthType Basic
< AuthName "openDCIM"
< AuthUserFile /var/www/.htpasswd
< Require valid-user
< </Directory>
< </VirtualHost>
#
必要なディレクトリファイルの作成
# mkdir -p /www/docs/dcim/
#
パスワード設定
openDCIMにログインするのに必要となる
# touch /var/www/.htpasswd
# htpasswd /var/www/.htpasswd Administrator
New password:<password>
Re-type new password:<password>
Adding password for user Administrator
#
ネットワーク周り点検
ひとまず検証なので余計なことをしないように切っておく
# cp /etc/selinux/config /etc/selinux/config.`date -I`
# vim /etc/selinux/config
# diff /etc/selinux/config /etc/selinux/config.2017-07-28
7c7
< SELINUX=disabled --- > SELINUX=enforcing
#

# service iptables stop
# chkconfig iptables off
# chkconfig | grep iptables
iptables       	0:off	1:off	2:off	3:off	4:off	5:off	6:off
#
openDCIMをインストール
# cd /var/www/
# wget http://www.opendcim.org/packages/openDCIM-3.2.tar.gz

# tar xzvf openDCIM-3.2.tar.gz
# mv openDCIM-3.2.1 opendcim
# rm openDCIM-3.2.tar.gz
rm: remove regular file `openDCIM-3.2.tar.gz'? yes
#
openDCIM設定
DBのパスワードを入力
# cd /var/www/opendcim
# cp db.inc.php-dist db.inc.php
# vim db.inc.php

# diff db.inc.php-dist db.inc.php
6c6
< $dbpass = 'dcim'; --- > 	$dbpass = 'password';
#
鍵問題
鍵が作られていなかった
# service httpd restart
Stopping httpd:                                            [  OK  ]
Starting httpd:                                            [FAILED]
#

# tail /etc/httpd/logs/error_log
[error] SSL Library Error: 185073780 error:0B080074:x509 certificate routines:X509_check_private_key:key values mismatch
#
対処
# pwd
/var/www/opendcim
# cd /etc/pki/tls/certs/
#

# openssl x509 -in ca.csr -days 365000 -req -signkey ca.key > ca.crt
Signature ok
subject=/C=XX/L=Default City/O=Default Company Ltd
Getting Private key
#

# vim /etc/httpd/conf.d/ssl.conf
# diff /etc/httpd/conf.d/ssl.conf /etc/httpd/conf.d/ssl.conf.2017-07-28
105c105
< SSLCertificateFile /etc/pki/tls/certs/ca.crt --- > SSLCertificateFile /etc/pki/tls/certs/localhost.crt
112c112
< SSLCertificateKeyFile /etc/pki/tls/certs/ca.key --- > SSLCertificateKeyFile /etc/pki/tls/private/localhost.key
#
# service httpd restart
Stopping httpd:                                            [  OK  ]
Starting httpd:                                            [  OK  ]
openDCIM設定
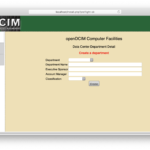
あとはブラウザからアクセスをして色々設定していく。
最後に以下の画面が現れるので、したがってinstall.phpを消す(今回は名前変更だけした)

# cd /var/www/opendcim/
# mv install.php install.php.`date -I`
#

# service httpd restart
Stopping httpd: [ OK ]
Starting httpd: [ OK ]
#
ここから使いこなすのが大変そう、、
(追記)使ってみた。
OpenDCIMを使ってみる
VirtualboxのNetwork設定周りで困ったら、Oracle ZFS StorageをVirtualboxで動かすまで のネットワーク設定を参考に。
MySQLのエラーが出てきたらCan’t connect to local MySQL server through socket ‘/var/lib/mysql/mysql.sock’ と出た時を参考に。