この記事は3年以上前に書かれた記事で内容が古い可能性があります
OEM Cloud Control13cをOracleLinux6 on Virtualboxにインストールする〜(1.5)事前準備〜
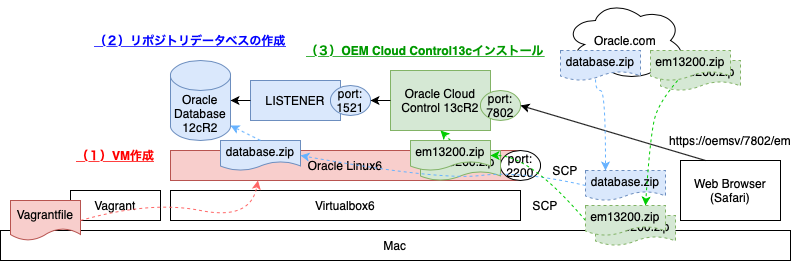
「OEM Cloud Control13cをOracleLinux6 on Virtualboxにインストールする〜(1)VM作成〜」の続き
リポジトリ用のデータベースを作るための事前準備
全体図
全体目次
(1.5)事前準備:目次
(1.5−1)必要パッケージインストール
必要パッケージのインストール
# yum -y install make binutils gcc libaio glibc-common libstdc++ libXtst sysstat glibc-devel glibc-devel.i686
「oracle-database-server-12cR2-preinstall」というOracle Databaseを入れるにあたりいい感じに環境を整えてくれるパッケージがあるので利用する
※インストールするバージョンによって名前が違うので注意
参考:オペレーティング・システム構成を完了するためのRPMパッケージ
# yum -y install oracle-database-server-12cR2-preinstall
設定反映
# sysctl -p
vimとunzipも使うのでインストール
# yum -y install vim unzip
(1.5−2)hostsファイル編集
バックアップを取りつつ、Hostsファイルを編集
今回は、oemsvというホスト名
ドメインはlocaldomain
# cp /etc/hosts /etc/hosts.20201022
# vim /etc/hosts
# diff /etc/hosts /etc/hosts.20201022
1c1
< 192.168.33.101	oemsv.localdomain	oemsv
---
> 127.0.0.1	oemsv	oemsv
[root@localhost ~]#
[root@localhost ~]# cat /etc/hosts
192.168.33.101	oemsv.localdomain	oemsv
127.0.0.1   localhost localhost.localdomain localhost4 localhost4.localdomain4
::1         localhost localhost.localdomain localhost6 localhost6.localdomain6
(1.5−3)Oracleユーザー設定
「oracle-database-server-12cR2-preinstall」が必要なユーザーを作ってくれているので、
oracleユーザーのパスワード設定
参考:Oracleインストール所有者アカウントについて
# passwd oracle
Changing password for user oracle.
New password:
BAD PASSWORD: it is based on a dictionary word
Retype new password:
passwd: all authentication tokens updated successfully.
確認
# id oracle
uid=54321(oracle) gid=54321(oinstall) groups=54321(oinstall),54322(dba),54323(oper),54324(backupdba),54325(dgdba),54326(kmdba),54330(racdba)
(1.5−4)ディレクトリ作成
インストール先のディレクトリ作成
# mkdir -p /u01/app
# chown -R oracle:oinstall /u01/app
(1.5−5)iptables停止
iptablesの停止
# service iptables stop
# chkconfig iptables off
(1.5−6)selinux設定変更
selinuxをバックアップを取りつつ「permissive」に設定変更
# cp /etc/selinux/config /etc/selinux/config.20201022
# vim /etc/selinux/config
# diff /etc/selinux/config /etc/selinux/config.20201022
6c6
< SELINUX=permissive
---
> SELINUX=enforcing
[root@localhost ~]#
(1.5−7)GUI環境構築
最後にGUI環境の構築が必要
手順は、こちらを参照ください
OracleLinux6でGUI環境を後から入れたい
続きはこちら
OEM Cloud Control13cをOracleLinux6 on Virtualboxにインストールする〜(2)リポジトリ用DBの作成〜