この記事は3年以上前に書かれた記事で内容が古い可能性があります
OEM Cloud Control13cをOracleLinux6 on Virtualboxにインストールする〜(1)VM作成〜
勉強用にOEM Cloud Control13cを入れた際の手順メモ
色々調べるとTempleteを使った方法がでてくるが、(うまくいかなかったので、、、)今回はテンプレートを使わずに、OEM Cloud Control13cを導入する
※テンプレートは、「使うとインストールの時間が大幅に削減できるよ」というものなので使わなくても支障はない
参考リンク
環境
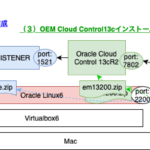
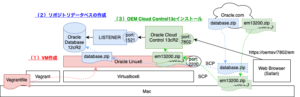
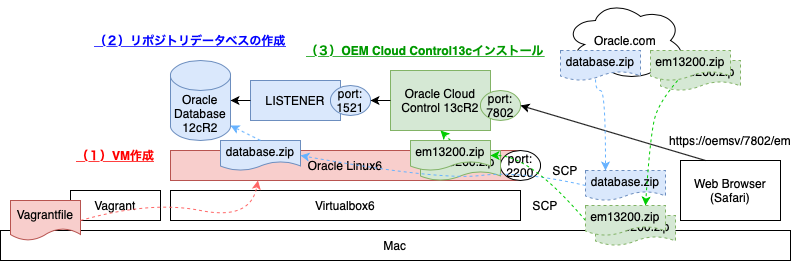
全体図
全体目次
(1)VM作成:目次
(1ー1)VagrantでVM作成
※Macから操作
ディスクサイズがだいぶ必要で、Vagrantfileで自動的に定義したいので「vagrant-disksize」をインストールしておく
% vagrant plugin install vagrant-disksize
Vagrantfileを作成する
今回は、Olacle Linuxを使う
参考:Using Oracle Linux Vagrant boxes
メモリは8GB、ディスクは100GBつけておく
% cat Vagrantfile
# -*- mode: ruby -*-
# vi: set ft=ruby :

Vagrant.configure("2") do |config|

  config.vm.define "oemsv" do |server|
    server.vm.box = "oraclelinux/6"
    server.vm.box_url = "https://oracle.github.io/vagrant-projects/boxes/oraclelinux/6.json"
  end

  config.vm.provider "virtualbox" do |vb|
    vb.gui = true
    vb.name = "oemsv"
    vb.memory = "8192"
    vb.cpus = "2"
  end

  config.vm.hostname = "oemsv"
  config.vm.network "private_network", ip: "192.168.33.101"
  config.disksize.size = "100GB"

end
「vagrant up」でVMを起動すると、ファイルシステムのリサイズは自分でやってねと出てくる
% vagrant up
...
==> oemsv: Resized disk: old 37888 MB, req 102400 MB, new 102400 MB
==> oemsv: You may need to resize the filesystem from within the guest.
...
VMが出来上がったらログイン
% vagrant ssh
※ここからはVM上の操作
rootユーザーにパスワード設定しておく
$ sudo su
# passwd
Changing password for user root.
New password:
BAD PASSWORD: it is based on a dictionary word
Retype new password:
passwd: all authentication tokens updated successfully.
# su - root
#
(1ー2)FILEシステムリサイズ
vagrant upした際に「==> oemsv: You may need to resize the filesystem from within the guest.」とあったのでFILEシステムリサイズをする
参考:Virtualbox6上のCentOS7のディスク拡張したい(VMDKとPVとVGの拡張)
dfコマンドで確認すると、現状、/vagrantに100GBついているので、/配下につけるようにする
# df -h
Filesystem            Size  Used Avail Use% Mounted on
/dev/mapper/vg_main-lv_root
                       32G  992M   30G   4% /
tmpfs                 3.8G     0  3.8G   0% /dev/shm
/dev/sda1             477M   33M  415M   8% /boot
vagrant               932G  604G  329G  65% /vagrant
fdiskコマンドでリサイズする(厳密には一旦消して新しく作る)
pコマンドで確認すると、「/dev/sda2」がLVMになっている
# fdisk /dev/sda

WARNING: DOS-compatible mode is deprecated. It's strongly recommended to
         switch off the mode (command 'c') and change display units to
         sectors (command 'u').

Command (m for help):
Command (m for help): p

Disk /dev/sda: 107.4 GB, 107374182400 bytes
255 heads, 63 sectors/track, 13054 cylinders
Units = cylinders of 16065 * 512 = 8225280 bytes
Sector size (logical/physical): 512 bytes / 512 bytes
I/O size (minimum/optimal): 512 bytes / 512 bytes
Disk identifier: 0x000a524d

   Device Boot      Start         End      Blocks   Id  System
/dev/sda1   *           1          64      512000   83  Linux
Partition 1 does not end on cylinder boundary.
/dev/sda2              64        4831    38284288   8e  Linux LVM

Command (m for help):
dコマンドで一度削除する
Command (m for help): d
Partition number (1-4): 2

Command (m for help):
再びpコマンドで無事に消えていることを確認
Command (m for help): p

Disk /dev/sda: 107.4 GB, 107374182400 bytes
255 heads, 63 sectors/track, 13054 cylinders
Units = cylinders of 16065 * 512 = 8225280 bytes
Sector size (logical/physical): 512 bytes / 512 bytes
I/O size (minimum/optimal): 512 bytes / 512 bytes
Disk identifier: 0x000a524d

   Device Boot      Start         End      Blocks   Id  System
/dev/sda1   *           1          64      512000   83  Linux
Partition 1 does not end on cylinder boundary.

Command (m for help):
nコマンドで新しく作成する
Command (m for help): n
Command action
   e   extended
   p   primary partition (1-4)
p
Partition number (1-4): 2
First cylinder (64-13054, default 64):
Using default value 64
Last cylinder, +cylinders or +size{K,M,G} (64-13054, default 13054):
Using default value 13054

Command (m for help):
wコマンドで保存して終了
Command (m for help): w
The partition table has been altered!

Calling ioctl() to re-read partition table.

WARNING: Re-reading the partition table failed with error 16: Device or resource busy.
The kernel still uses the old table. The new table will be used at
the next reboot or after you run partprobe(8) or kpartx(8)
Syncing disks.
設定反映のため再起動
# shutdown -r now
※ここでなぜかホスト名おかしくなった(oemsvがlocalhostになった)が、後の再起動で直ったのでスルー、、、
PVリサイズ
# pvresize /dev/sda2
  Physical volume "/dev/sda2" changed
  1 physical volume(s) resized / 0 physical volume(s) not resized
「Free PE / Size」が増えていることを確認
# vgdisplay
  --- Volume group ---
  VG Name               vg_main
  System ID
  Format                lvm2
  Metadata Areas        1
  Metadata Sequence No  4
  VG Access             read/write
  VG Status             resizable
  MAX LV                0
  Cur LV                2
  Open LV               2
  Max PV                0
  Cur PV                1
  Act PV                1
  VG Size               99.50 GiB
  PE Size               32.00 MiB
  Total PE              3184
  Alloc PE / Size       1168 / 36.50 GiB
  Free  PE / Size       2016 / 63.00 GiB
  VG UUID               7vr5ZE-1t1K-bsg9-fqlE-brM7-bL17-6oqvwu
VG拡張
# lvextend -l +100%FREE /dev/mapper/vg_main-lv_root
  Size of logical volume vg_main/lv_root changed from 32.50 GiB (1040 extents) to 95.50 GiB (3056 extents).
  Logical volume lv_root successfully resized.
「Free PE / Size」が無くなって「Alloc PE / Size」に移ったことを確認
# vgdisplay
  --- Volume group ---
  VG Name               vg_main
  System ID
  Format                lvm2
  Metadata Areas        1
  Metadata Sequence No  5
  VG Access             read/write
  VG Status             resizable
  MAX LV                0
  Cur LV                2
  Open LV               2
  Max PV                0
  Cur PV                1
  Act PV                1
  VG Size               99.50 GiB
  PE Size               32.00 MiB
  Total PE              3184
  Alloc PE / Size       3184 / 99.50 GiB
  Free  PE / Size       0 / 0
  VG UUID               7vr5ZE-1t1K-bsg9-fqlE-brM7-bL17-6oqvwu
ファイルシステム拡張
※CentOS7、Oracle Linux7の場合は「xfs_growfs」コマンド
# resize2fs /dev/mapper/vg_main-lv_root
resize2fs 1.43-WIP (20-Jun-2013)
Filesystem at /dev/mapper/vg_main-lv_root is mounted on /; on-line resizing required
old_desc_blocks = 3, new_desc_blocks = 6
The filesystem on /dev/mapper/vg_main-lv_root is now 25034752 blocks long.
/配下の容量が増えていることを確認
# df -h /
Filesystem            Size  Used Avail Use% Mounted on
/dev/mapper/vg_main-lv_root
                       94G 1004M   89G   2% /
(1−3)SWAPファイル作成
こちらを確認すると、メモリ(8GB)と同じ容量のSWAPファイルが必要とのことなので作成する
Oracle Databaseインストールのサーバー構成のチェックリスト
参考:OracleDatabase12cをインストールするときにSwapfile sizeが足りないと言われたので追加する
「/swapfile」を1MB×8192=8GBで作成する
# sudo dd if=/dev/zero of=/swapfile bs=1M count=8192
8192+0 records in
8192+0 records out
8589934592 bytes (8.6 GB) copied, 10.9406 s, 785 MB/s
権限変更
# chmod 600 /swapfile
Swapfileにする
# mkswap /swapfile
mkswap: /swapfile: warning: don't erase bootbits sectors
        on whole disk. Use -f to force.
Setting up swapspace version 1, size = 8388604 KiB
no label, UUID=cefc17e4-f3cf-4c16-83da-cff94b85d41f
Swap on
# swapon /swapfile
無事に/swapfileという8GBのSwapfileが作成できていることを確認
# swapon -s
Filename				Type		Size	Used	Priority
/dev/dm-0                               partition	4194300	0	-1
/swapfile                               file		8388604	0	-2
続きはこちら
OEM Cloud Control13cをOracleLinux6 on Virtualboxにインストールする〜(1.5)事前準備〜